
|
When starting a new sewing project, you’ll often find that the instructions you’re following tell you to prewash your fabric. We’ve all been there - staring at the fabric, wondering if prewashing really is necessary. Why wait for the washing machine, the drying, and the ironing process to be over with when you could just dive straight into your next project? As annoying as it is, pre-washing fabric is actually a vital step in most sewing projects. To learn why you should pre-wash your fabrics, how to wash them, and a few exceptions to the rules, keep on reading. Why you should pre-wash your fabric before sewing.Avoid shrinkage by pre-washing your fabric before sewing. The main reason it’s advised that you prewash fabric before sewing is to avoid shrinkage. Seasoned sewists will tell you that most natural fibres shrink during their first wash - a fact they probably found out via the hard way! Cotton shrinks by about 5% when washed for the first time, but it’s not uncommon for cotton and other natural fibres to shrink by up to 10%. Wash your fabric just like you’ll wash the final garment. The old “measure twice, cut once” phrase won’t help you if your fabric shrinks when wet, so avoid this problem completely by washing your fabric before sewing. If you’re planning on hand washing the garment, you need to prewash the fabric in the same manner. This means that if you’re planning on making your garment machine washable, make sure the fabric has been pre-washed in the washing machine at 30°C. It’s also handy to throw your fabric in the tumble dryer too if that’s a method of drying you’re going to be using as part of your normal laundry routine. Even if you’re planning on air drying your garments, it’s good to put the fabric in the tumble dryer, just in case your garment ends up in there by accident. Pre-washing also helps rid fabrics of dyes and chemicals. Another great reason to pre-wash your fabric before sewing is to wash away any chemical treatments, dyes, starch, and dirt. A starch treatment is often used on the fabric to make it look crisp and clean on the bolt, so pre-washing the fabric makes it softer and easier to work with. When is it okay to not pre-wash fabric before sewing?There are a few cases where a pre-wash is not strictly required, although some preparation might help with the overall sewing process. If the item you’re planning on sewing is unlikely to need washing - for example pencil cases, peg bags, scrunchies, bunting, and other accessories, then it’s not strictly necessary for you to pre-wash it. If it can be cleaned with a damp cloth effectively, there’s no need to wash the fabric before sewing. Fabrics that are dry clean only and garments that need to hold their structure would benefit more from a light steaming before cutting and sewing. Hold an iron above, but not on, the fabric and let the steam penetrate the fabric, this method also allows for any fabric shrinkage. 100% synthetic fabrics aren’t likely to need pre-washing to prevent shrinkage, however it’s still worth washing the fabric as this will remove dirt and dyes. Pre-washing denim may lead to white lines where the fabric creases and folds during the wash. For this reason, some people don’t pre-wash denim and prefer to cut and sew with it straight away. How do I pre-wash my fabric?We already spoke about how you need to pre-wash your fabric just like you’re going to wash the finished garment. One thing to consider is the raw frayed edges of the fabric. In some cases, you may need to protect the raw edges before pre-washing your fabric to avoid losing length. Pre-fraying your fabric is one option, or running a zig-zig stitch or overlocker up the raw edges is another method to prevent fraying. Of course, you could always pre-wash your fabric and remove the frayed edges afterwards - but if you are planning on measuring the shrink rate - you will need to finish the edges first. and ALWAYS finish the edges on Sweater Knit fabrics as they will die a death in your machine without it. Looking for a few more tips on pre-washing fabric before sewing?
If you have any questions about pre-washing hop on into my free Facebook group Stitch Sewcial to ask any questions - I'm very quick to comment or reply and there is a huge community of wonderful sewists just waiting there to support oyu as you go!
2 Comments
For anyone who wishes to create their own clothing, learning how to measure your body for sewing patterns is an essential skill. Making your own clothes is an incredibly satisfying and rewarding way of expanding your wardrobe. It can also serve as a fantastic way of doing your bit to reduce the environmental impact fast fashion has on the planet - especially if you source fabrics sustainably by thrifting or upcycling. Slow Sew with STITCH SewcialIf you are a keen garment maker or want to improve your me-made, over on our brilliant StitchSewcial Facebook page, we host optional monthly challenges to encourage creativity among our members. Many people use their body measurements to hack and alter patterns and a recent challenge focused on ‘reinvention’ encouraging our sewists to create something completely new out of unused duvet covers. We had some absolutely brilliant creations shared on the page, from delicate summer dresses and floaty harem trousers, to the ever practical cotton dungarees and storage baskets. If you are interested in taking part in our monthly #GetSetSew challenges, head to our Facebook page and introduce yourself. Why taking accurate measurements is so important
What equipment do you need to measure yourself for sewing patterns?In order to accurately measure yourself for clothing, all you need is a tape measure and something with which to write your measurements down. If you’ve seen my Essential Sewing Supplies For Beginners blog post, you’ll know that tape measures are an invaluable tool in the world of sewing, they’re also cheap and hard wearing (although they can stretch over time). It may help you to have another person on standby to write the measurements down for you or help you with accurately placing the tape measure. However, it’s possible to do it yourself by using a full length mirror to check you’re measuring the fullest part of your body. Tips and tricks to guarantee an accurate body measurement.Before you get started, have a quick read of these tips to make sure the process is as easy as possible.
How to measure your body for sewing patternsThere are three basic measurements that most garments will require: bust, waist, and hips. There are also quite a few additional measurements that you may wish to take to either ensure a better fit or create a specific garment. Remember that when measuring yourself for sewing patterns, you need to breathe normally and stand up straight. Bust: Wrap the tape measure around the fullest part of your bust and measure the total circumference. Ensure the tape measure stays flat and horizontal all the way around your body - using a mirror is helpful. Waist:Your waist is the smallest part of your torso, where the body bends. Wrap the tape measure around yourself and have a little wiggle from side to side, this will help you find the ideal spot. Once again check that the tape measure stays flat and horizontal the entire way around your body. Hips:Hip measurements are not necessarily taken where you’d think they ought to be. Most people assume that to measure this area you must measure where the bones of your hips are. However, this is often not the case. You need to measure the widest part of the area, and that often means measuring around your bottom. It helps to stand sideways in front of a mirror to make sure you’re measuring the widest part. Additional body measurements you may wish to recordSome types of clothing require additional measurements, such as trousers and formal shirts. Use the following guide to ensure you get accurate measurements - remember to breathe normally and keep the tape measure flat against your skin.
There is a FREE PDF download for you available on the Resources page which you can use to help you with your measuring... It's available for both male and female bodies. What to do next?Now you’ve got to grips with measuring your body for sewing patterns, it’s time to start sewing! Some of my recent garment makes include the wonderful Tessuti Isla Top and the Sapporo Coat by Papercut Patterns. Start To Stitch FreebiesIf you’re not quite ready to make your own clothes, I offer several free beginner patterns on our website that are perfect for beginner sewists to get stuck into and hone their skills. You can choose between our Start To Stitch Bunting, Start To Stitch Free Twist Headband, or the ever practical Start To Stitch free Face Covering pattern. I would also invite you to head over to Facebook and join our thriving Stitch Sewcial group as mentioned above, where I post monthly challenges, as well as share great tips, tricks, pattern suggestions, and advice. Don't forget to check out our resource library too! Start to Stitch Courses
If you’re new to the world of sewing and garment making, first of all - welcome! You’ve entered into a magical world of creativity and individuality, and I’m so glad you’re here. When you discover a new hobby, sometimes the terminology and additional hobby-focused information can be a little overwhelming at first. We’ve all been there, trust me. But never fear, because I am here to help! As well as hosting Beginner and Intermediate Sewing online courses, I also run workshops and evening courses. Feel free to view our course page if you’re interested in finding out more information on the type of tuition I can offer you. I’m experienced in teaching beginners everything they need to know about sewing, and often find that terminology queries arise on my social media channels, and the Stitch Sewcial Facebook Group. Getting started with sewing is an exciting and rewarding experience, so let’s go through the A-Z of basic terminology you’re likely to come across as a beginner sewist. Note: This glossary has been written for beginners!This blog post is aimed at complete beginners who want to start creating projects straight away. A more comprehensive list of sewing terms will be available in the future - sign up to the Start To Stitch newsletter if you’d like to be among the first to receive it. A Applique: Sewing a piece of fabric on top of another layer of fabric, so that they seamlessly look as one. The layer that you’re applying on top is sometimes folded slightly at the edges to create a clean look, or a satin stitch is used to completely cover the raw edge of the piece being appliqued. B Back-tack / back-stitch: This stitch is used at the beginning and end of a sewing machine seam to anchor the thread in place. It refers to adding a couple of extra stitches backwards and forwards and can also be referred to as back tracking. Back-stitching can also refer to a type of embroidery stitch. Baste or basting-stitch (also known as tacking): Temporary stitching used to hold fabric in place; this is removed when your permanent sewing is done. Can be done by hand or sewing machine. Bias: Diagonal cross-grain of the fabric at 45 degrees; the area of fabric that has the most stretch. Bias binding: Narrow strips of fabric that are cut on the bias of the fabric at 45 degrees; the area of fabric that has the most stretch. This makes a tape that can be used to bind or face curved areas of your make. Bobbin: A plastic or metal spool that you wind thread around. It goes into the bottom of your sewing machine to feed a line of thread beneath the needle and must be inserted and wound up properly. Bodkin: A long, flat, needle-like tool with a blunt end that is used to thread elastic, ribbon and other materials through casing. We sell some lovely, handmade wooden bodkins in our Start To Stitch shop. Buttonhole: A small cut in the fabric that’s bound with small stitching. The hole is just big enough to allow a button to pass through it. C Casing: A folded over edge in a garment, usually around the waist. Used to enclose a way of adjusting the fit of the garment, such as using a draw string. Charm Square: Precut 5″ squares pieces of fabric used for patchwork and other sewing projects. D Darning: Repair a hole in clothing without using a patch. Double-fold hem: A hem that’s folded once to enclose the raw edge of the fabric, then folded again for the hem allowance. Drafting: Creating a sewing pattern based on body measurements. E Ease: A way of sewing a length of fabric into a bit of a smaller space without resulting in gathers or puckers. Also – the amount of space in a garment to enable it to fit the body better. Edging:Trims or decorative needlework that is used on the edge of the fabric. Embellishment: A decorative item added to a craft project for aesthetic reasons; includes beads, buttons, patches etc. Eyelet: Small holes are cut out in the fabric, then finished with an embellishment of thread around the opening. F Fastener: The method of fastening two separate bits of fabric together, such as zippers or buttons. Facing: A piece of fabric that is stitched to an opening such as a neckline, armhole or hem, on the inside of the garment. It stabilises this area and ensures a smooth fit and finish. Fat Quarter: As the name suggests, a fat quarter is a quarter of a metre of fabric but instead of being a strip cut on a linear length, it is a square (and because its a US measurement for quilting measures 18×22. It’s often used for patchwork and other crafting projects. Here’s a YouTube explanation that delves into what a fat quarter is and how it’s measured. Feed dog: Metal teeth like ridges that help to push the fabric along as you sew. Fold line: This refers to the fold in the centerfold or along the grain of your fabric. Many pattern pieces are placed on the fold line for cutting out. Foot Pedal: The part of a sewing machine that controls the speed at which the needle enters the fabric, and therefore the speed at which you sew. It is controlled by your foot and usually attaches to the sewing machine via a cable. French seam: A seam often used on delicate and sheer fabrics that helps to hide any raw edges in a neat double fold. Seam allowances are enclosed in this type of fold. G Gather: Running a thread along the fabric and then bunching the fabric up along the thread to create a ruffle a frill or the top of a puffed sleeve or gathered skirt at a waistband Grain / Grain line : The true grain runs parallel to the selvedge, and is visible in a woven fabric by looking closely at the threads - the warp threads denote the true grain. Pattern pieces are generally laid along the grain line, and this direction is shown on them by a double headed arrow The cross grain can also be used in place of the true grain on some stable woven fabrics - this is found at 90 degrees to the selvedge and can be spotting by following the weft threads from side to side of the woven cloth. Because some cloth is woven slightly wonky - it is always best as a beginner to focus on the true grain only to ensure your makes hang well and are as easy as possible to sew. H Hand finishing: Finishing the last details of your garment or sewing project by hand, as opposed to using a sewing machine. Hand wheel (also known as balance wheel): Use the hand wheel on the edge of your sewing machine to adjust the height of your needle. Hem: The edge of the garment or fabric project that is folded over and sown under in order to keep the raw edges from fraying and unravelling. I Interfacing: Interfacing is used to stabilise areas of a garment such as necklines, facings and zip insertions. It is a material used as a secondary layer of fabric in order and adds more stability and thickness to a garment. It can be stitched in, or ironed on ( fusible ) L Ladder stitch: A hand stitch used to close a seam invisibly. Use commonly to close gaps after you have pulled an item through to the right side. Layout or lay: The optimal layout refers to laying the patterns on your fabric in a way that ensures you do not create too much waste fabric, remain on grain, and ensure that the decorative pattern or nap of your fabric is in the same direction on all of your cut pieces. Lining: An inner layer of fabric underneath a top layer, often used in garment making to reduce friction ( to make things hang better ) and to hide all the inner workings of the make. M Motif: A dominant design element, usually ironed, embroidered or stitched on. N Nap: This term is used when dealing with fabrics that have a pile, such as velvet and corduroy. It’s important to cut these fabrics with the pile running in the same directions as the fabric’s hue changes depending on the way it is rubbed. Notches: Small indents, usually diamonds or triangles, that are printed on the cutting line of a pattern, on the seam allowance. This indicates where the seams should meet, or another pattern piece should fit. Notions: All the other items that you use while creating sewing projects - things along the lines of buttons, hooks, and elastic. O Overlocker: A specialised sewing machine that trims and neatens the edge of fabrics. P Pattern weight: A weight that’s used to keep paper patterns in place, rather than using pins. Commonly used in combination with a rotary cutter and cutting mat Piping: A decorative finish where a piece of cord is encased in a piece of bias binding and stitched into a seam so that on the wrapped cord is visible. Usually used on homesown items such as cushions, and also on garments. Pivot: To leave the needle in the fabric, raise the presser foot, and turn the fabric at a 45-degree angle. Then lower the presser foot and start sewing. Used to sew square seams. Pleats: Pleats are folds in fabric that add to fullness, and reduce a long width of fabric into a shorted length to attach to a waistband or sleeve head for example. There are different varieties of pleats, and these depend on the style and fitting of the garment you’re making. Presser foot: Holds the fabric in place as you sew with your sewing machine. R Raw edge: The unfinished edge of fabric, after cutting before you have overlocked, or hemmed. Right side: The right side of the fabric is usually the design side. There are instances of fabric with no right or wrong side visible, or you may choose to use the reverse of your fabric to face out on your garment and so the determination and appropriate markings are then made by the person doing the pattern cutting and sewing. Rotary cutter: A tool used for cutting fabric quickly and easily. It can cut through several layers of fabric at once. It is a circular wheel / blade attached to handle which you roll along your fabric to slice through - you will always need a cutting mat to prevent damage to your table! S Seam allowance: The amount of fabric which is between the edge and the seam. In older patterns this is ⅝ of an inch. More modern patterns tend to leave 1cm unless extra is required for fitting or french seams. Seam: Where two pieces of fabric have been sown together. Seam Ripper: A tool used to rip seams from the fabric and undo stitches previously made. Selvedge: The finished edge on either side of your cut cloth Spool pin: Keeps the spool of thread in place so the thread can be fed through your sewing machine. Stay Stitch: Sewing a line of straight stitch along the curved areas of a cut pattern piece before assembling into a seam, in order to stabilise and prevent distortion. Stitch Length: The length of your machined stitches. In general, regular sewing is made with stitches that are about 3-4 mm and basting/gathering/bunching/sleeve easing stitches are about 5mm. Stitch Width: The width of your machined stitches. A regular straight stitch has no stitch width because the needle is in a stationary position and does not move from side to side. When you make a zig-zag stitch, the needle moves left to right as well as up and down, and the width is the distance in mm of needle drops left to right. A good zig-zag stitch for stretch top stitching is 2.5mm length and 2.5mm width. Straight Stitch: The stitch setting on your machine that looks like a straight line. The needle creates this by puncturing the fabric up and down on the same spot as the fabric is pushed through the machine by the feed dogs. T Thread cutter: A sharp tool on the edge of your sewing machine for cutting excess thread. W Wadding: Material, such as cotton or wool, that is used for filling items. Warp: The threads that travel along the width of your fabric from selvedge to selvedge Weft: The threads that travel along the length of your fabric, running parallel with the selvedge Wrong side: The opposite side of the fabric to the side you have chosen to face out Z Zig-zag Stitch: The stitch setting on your machine that looks like a zig-zag line. The needle creates this by puncturing the fabric up as well as moving from left to right as the fabric is pushed through the machine by the feed dogs. Zipper: A zip is constructed from two tapes, usually attached at the bottom, each with a row of tiny ‘teeth’ that interlock when the tapes are pulled through a ‘pull’ Invisible zips are designed so that the seam covers up the teeth mechanism and the zipper can be concealed. Open-ended zips still have the 2 parallel rows of teeth, however the ends are not joined. Instead they meet in a small box and pin mechanism, allowing you to separate two parts entirely - this is often found in jackets and coats. And... don't forget if you have any questions at all - just pop into my FREE Facebook group Stich Sewcial for tips tricks advice and an incredible and lovely community to support you!
So you want to start sewing - amazing news, welcome to a wonderful world of creativity and expressionism! There are only a few supplies you need in order to get started, and those supplies will see you through 99% of all projects you’re likely to start off with as a beginner sewist. After you acquire the sewing supplies for beginners listed below, you’re ready to begin your journey. Once you’ve become familiar with your sewing supplies and equipment, the world truly is your oyster. Free beginner projects, such as our Start To Stitch Bunting, Start To Stitch Free Twist Headband, or the ever practical Start To Stitch free Face Covering pattern are all great for sewists who are just starting out and wanting to create something practical and pretty. As your confidence grows and your love for sewing blossoms, you may wish to take your sewing to the next step. Here at Start To Stitch, we are proud to offer excellent valued courses for Beginners and Intermediate sewists. In each course, you’ll learn new techniques and troubleshoot common issues, as well as create wonderful handmade items. Both courses are held through a dedicated Facebook Group, with detailed video tutorials. Live video support and weekly tutoring calls are also included as part of the course, meaning that support and encouragement is always only a click away. Head to our Online Courses page for more information. Sewing Supplies For BeginnersIf you’ve landed on this page, you’re likely here for one reason, and one reason only: to find out exactly what tools and equipment you need in order to start sewing. Below is a list of the basic, yet essential, sewing supplies you’ll need as a beginner. There are obviously many more sewing tools that can be added to your collection as your confidence grows, however the list below will enable you to get started as soon as possible. So if you want to know what sewing supplies you should be looking out for as a total beginner, keep reading! SEWING MACHINE
NeedlesYou’re going to need needles for your sewing machine. Picking up some spare needles is a great idea as sometimes needles do break, and you should change your needle after every project - if this happens to you, here’s a great YouTube video tutorial on How To Change A Needle On Your Sewing Machine. You may also want to purchase some needles for hand stitching as well. BobbinsBobbins pass the bottom thread up in your sewing machine. These need to be wound up and inserted properly into the machine. Here’s a video tutorial on How To Wind A Bobbin On Your Sewing Machine. Bobbins are cheap to buy and come in a variety of materials, including clear plastic and metal. Check what type your machine uses - some brands use a different design.
Marking ToolsA marking tool is always handy for marking out patterns onto your fabric. There’s lots of choice, so it’s whatever tool you feel most comfortable using. Some sewists use good old fashioned chalk, some use heat erase marking pens, and some use disappearing ink that vanishes after washing the fabric.
Clear RulersClear rulers are a definite must have for any beginner sewist. Clear rulers allow you to see exactly what you’re doing, where you’re marking and what you’ll eventually end up cutting and sewing. If you can get one with a metal edge you can use it with your rotary cutter too!
Seam RipperIt’s not just beginners who need a good seam ripper, even the most experienced garment makers make mistakes. Not only can the seam ripper be used to rip out stitches that were sown by mistake, but it can also be used to open up button holes, cut threads and remove stitches. In our Start To Stitch store we sell beautiful handmade seam rippers made from reclaimed, sustainably sourced wood. Iron & Ironing BoardIt’s essential to iron your fabric and get all those wrinkles out before you get to work. Wrinkles will affect the shape of your fabric, so make sure it’s lovely and smooth before you start cutting and sewing. You should press every seam as you stitch it too - it will level up your making game!
If you have any questions don't forget you can hop on over into my free sewing group Stitch Sewcial and ask away! Its a hot line to me and many other very experienced sewists and is a wonderful community to be a part of!
Ever found yourself rummaging through a box of fabric and feeling a tad unsure about what it is that you’ve actually got? Sometimes sewists need a little extra help pinpointing the fibres that make up their fabrics, and it really doesn’t matter if you’re a complete novice or a seasoned garment maker - we have all found ourselves pondering a fabric’s make-up at least once. Inspecting the fabric closely may give you a few clues as to its quality and fibre makeup, however, oftentimes this is not enough. For a more conclusive identification, you can conduct what is commonly referred to as a ‘fabric burn test’. This simple, easy test will give you the information you need to more accurately identify your fabric. It’s a relatively straightforward test to carry out and can be done at home in a well ventilated area. In this blog post, I will tell you how to carry out a fabric burn test safely and help you to compare your results in order to identify your fabric and fibres. I’ve also provided a handy fabric burn chart printable that is 100% free and makes the perfect accompaniment for your studio or work space. If you’re ready to get started - read on! What is a fabric burn test?A fabric burn test is, as the name suggests, a test in which you burn a small part of fabric; by burning the fabric and observing the flame, the smell, and the ashes, you’re able to better understand what fibres your fabric is made from. Once you know whether your fibres are natural or synthetic, you’re able to make informed decisions when working with it. It’s worth nothing that some fabrics are made of a blend of fibres which can make burn tests an unreliable way of identifying fibre content. Some fabrics also have chemical finishings applied to them which can also make the test unreliable. How To Conduct A Fabric Burn TestA fabric burn test is a relatively simple test to conduct - all you need to do is observe the smell, the flame and the ashes that are left after the flame has died. The more complex part comes when you move on to identifying fibres using your findings. This is where this blog post, and our handy Fabric Burn Test Chart in our Resource Library comes in to use! Equipment: Gather the following tools and equipment to help you carry out the test.
Cut a small but workable amount of fabric; a good amount is around 2 square inches. Next, place the fabric into a flame proof container and set one corner on fire. You need to then pay attention to the:
It’s a good idea to use long handled tweezers in order to better examine the flame. Make sure you take all the necessary precautions and have a bucket of water at the ready in case you need to extinguish the flame. If you’re conducting the fabric burn test outside, please make sure that it isn’t a windy day, as this could prove to be extremely dangerous! When conducting the fabric burn test indoors, make sure that you’re in a well ventilated area. Once you have your findings, use the chart below to help you identify the fibres. (You can download this in full resolution from our resources section here) 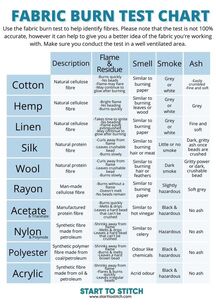 Hopefully you now have a better understanding of your fabric’s fibre content and you feel more confident working with the materials at your disposal. Now that you’ve got the basics, how about getting your teeth stuck into one of our free sewing projects? If you’ve enjoyed this post and found it useful, please give it a share on your social media platforms and help spread the joy of sewing!
And don't forget if you have any questions on any aspect of sewing you can drop into my Free facebook group Stitch Sewcial and call for help and I'll be happy to answer! |
AuthorSewing. pattern cutting, teaching, tea and Jelly Babies! Categories
All
Archives
December 2023
|

 RSS Feed