|
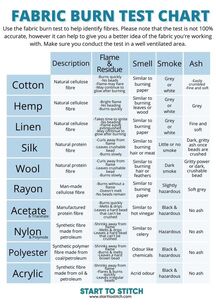
Ever found yourself rummaging through a box of fabric and feeling a tad unsure about what it is that you’ve actually got? Sometimes sewists need a little extra help pinpointing the fibres that make up their fabrics, and it really doesn’t matter if you’re a complete novice or a seasoned garment maker - we have all found ourselves pondering a fabric’s make-up at least once. Inspecting the fabric closely may give you a few clues as to its quality and fibre makeup, however, oftentimes this is not enough. For a more conclusive identification, you can conduct what is commonly referred to as a ‘fabric burn test’. This simple, easy test will give you the information you need to more accurately identify your fabric. It’s a relatively straightforward test to carry out and can be done at home in a well ventilated area. In this blog post, I will tell you how to carry out a fabric burn test safely and help you to compare your results in order to identify your fabric and fibres. I’ve also provided a handy fabric burn chart printable that is 100% free and makes the perfect accompaniment for your studio or work space. If you’re ready to get started - read on! What is a fabric burn test?A fabric burn test is, as the name suggests, a test in which you burn a small part of fabric; by burning the fabric and observing the flame, the smell, and the ashes, you’re able to better understand what fibres your fabric is made from. Once you know whether your fibres are natural or synthetic, you’re able to make informed decisions when working with it. It’s worth nothing that some fabrics are made of a blend of fibres which can make burn tests an unreliable way of identifying fibre content. Some fabrics also have chemical finishings applied to them which can also make the test unreliable. How To Conduct A Fabric Burn TestA fabric burn test is a relatively simple test to conduct - all you need to do is observe the smell, the flame and the ashes that are left after the flame has died. The more complex part comes when you move on to identifying fibres using your findings. This is where this blog post, and our handy Fabric Burn Test Chart in our Resource Library comes in to use! Equipment: Gather the following tools and equipment to help you carry out the test.
Cut a small but workable amount of fabric; a good amount is around 2 square inches. Next, place the fabric into a flame proof container and set one corner on fire. You need to then pay attention to the:
It’s a good idea to use long handled tweezers in order to better examine the flame. Make sure you take all the necessary precautions and have a bucket of water at the ready in case you need to extinguish the flame. If you’re conducting the fabric burn test outside, please make sure that it isn’t a windy day, as this could prove to be extremely dangerous! When conducting the fabric burn test indoors, make sure that you’re in a well ventilated area. Once you have your findings, use the chart below to help you identify the fibres. (You can download this in full resolution from our resources section here) Hopefully you now have a better understanding of your fabric’s fibre content and you feel more confident working with the materials at your disposal. Now that you’ve got the basics, how about getting your teeth stuck into one of our free sewing projects? If you’ve enjoyed this post and found it useful, please give it a share on your social media platforms and help spread the joy of sewing!
And don't forget if you have any questions on any aspect of sewing you can drop into my Free facebook group Stitch Sewcial and call for help and I'll be happy to answer!
2 Comments
|
AuthorSewing. pattern cutting, teaching, tea and Jelly Babies! Categories
All
Archives
December 2023
|


 RSS Feed