
|
Hammocks, Air France and Marie Antoinette….yes really!!
The pattern challenge started bang on trend with a puff sleeved, shirred bodice, elasticated waist midi dress. Think Laura Ashley, think milk-maid, think Marie Antoinette… yes… Marie Antoinette and her shepherdess dress for her summer retreat at the beautiful Palace of Versailles! In France this dress was known as ‘la chemise de rien’, which literally translated means ‘the shirt of nothing’, as it was so lightweight and floaty. I just love the snippets of history from Amber Butchart... Long floaty midi dresses with voluminous sleeves have been all over the high street and really popular with home sewists for the last couple of years. Lots of members of our Stitch Sewcial Facebook group have made the Tilly and the Buttons Indigo Dress, the Friday Pattern Company Wilder Gown, and the Nina Lee Spring Dress. The McCalls 7969 has been especially popular, so much so it was our first Start to Stich and Stitch Sewcial TnT post. But I digress… back to the sewing bee chosen pattern. So, this had a shirred top, something which prompted a lot of discussion in the Stitch Sewcial live Sewing Bee Chat. Brogan was in her element this week, in fact I think she has worn a similar style dress to this for all her Sewing Bee appearances! So she in particular had a lot to live up to with this challenge. The fabric choices were amazing, with most of the sewists opting for lightweight cotton lawn and some choosing gorgeous liberty prints. The nursery rhyme ‘wind the bobbin up’ came to mind as we watched the contestants hand winding the shirring elastic around the bobbin, not too tightly or too loosely, to ensure the fabric would gather. Tension was rising in the work room, Bogan advised setting it at 7!! And, with a stitch length of 4 most of the sewists then generally got to grips with the shirring technique.
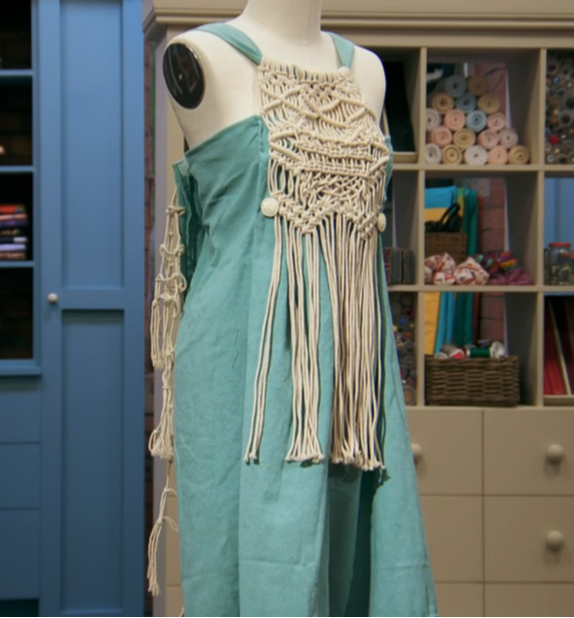
So onto the transformation challenge, and the Bees were tasked with making a summer outfit from garden hammocks, adding in some of the ropes, fringing and macrame to style it up. The criteria from Patrick was ‘the important thing is it ends up not looking like a hammock!’. The contestants didn’t hang around (sorry 😉) but took this on board and produced some interesting and considered transformations this week. Unfortunately Steve failed to impress the judges again in this challenge with the design of his top and shorts outfit looking off-line. And somewhat surprisingly Marnie found herself in 9th place as Patrick and Esme felt her dress was not a summer outfit. Brogan went nautical with her use of the rope in her skirt and came second, but it was Angela who won, with her use of the macrame on the front of her dress impressing the judges the most. However the Stitch Sewcial group felt that the festival jacket made by Christian was amazing, this came third but was certainly up there as a fabulous and totally wearable transformation. At one point it was modelled by Sara Pascoe who totally rocked it!
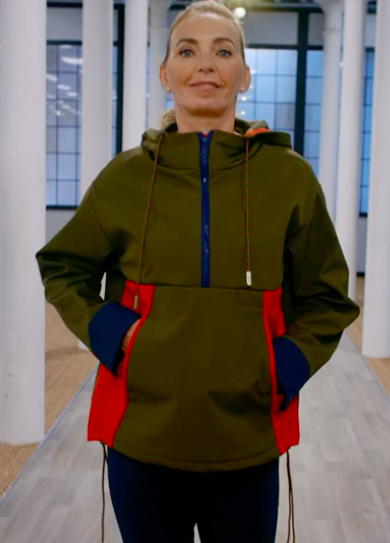
And just like that it was time for the Made to Measure Challenge. This week the contestants were tasked with making a fun in the sun two piece coordinated trouser outfit. With two disappointing makes behind him Steve needed to shine in this challenge. His look took inspiration for a shirt and shorts combo from the shirt worn by Leonardo DiCaprio in Baz Luhrmann’s Romeo and Juliet, immediately giving himself a high standard to live up to when Esme declared she had made Leo’s shirts for the film! However he was unperturbed and produced a very good outfit for the catwalk. Again the standard was high with some stunning outfits made by the Bees. This is where we saw the first ‘hungry bum' of the series - the award for which goes to Marnie for her trousers. Patrick felt Annie’s Ankara top was just about on the right side of descent, but did say that Brogan’s Spanish influence in the outfit she made showed as it was reminiscent of a flamenco dancer. She was criticised by Esme for choosing to have a tie at the front and the back of her top. The Stitch Sewcial group felt this was a bit harsh and personally I thought this looked just fine and worked for the pattern. Richy opted to use a self drafted pattern for harem pants, which included 30 pleats, probably more pleats than I’ve had broken machine needles!! However he admitted he had not tested the pattern, which begs the question ‘’WHY ON EARTH NOT?????’ This ‘oversight’ showed when had to give up on the pleats and gather the fabric instead due to a miscalculation in his pattern drafting. He also had a problem inserting the zip, which left his model pinned into the trousers for the catwalk …ouch!! The Garment of the week went to Debra with her Business Class Air France outfit, unfortunately once Patrick had described it as this it was hard to see it as anything else!. It was however, impeccably made, with a crisp clean finish and was a well deserved winner. Sadly for Richy his mistakes this week were too much for the judges, and as Steve had redeemed himself in the final challenge it was Richy who was sent home. 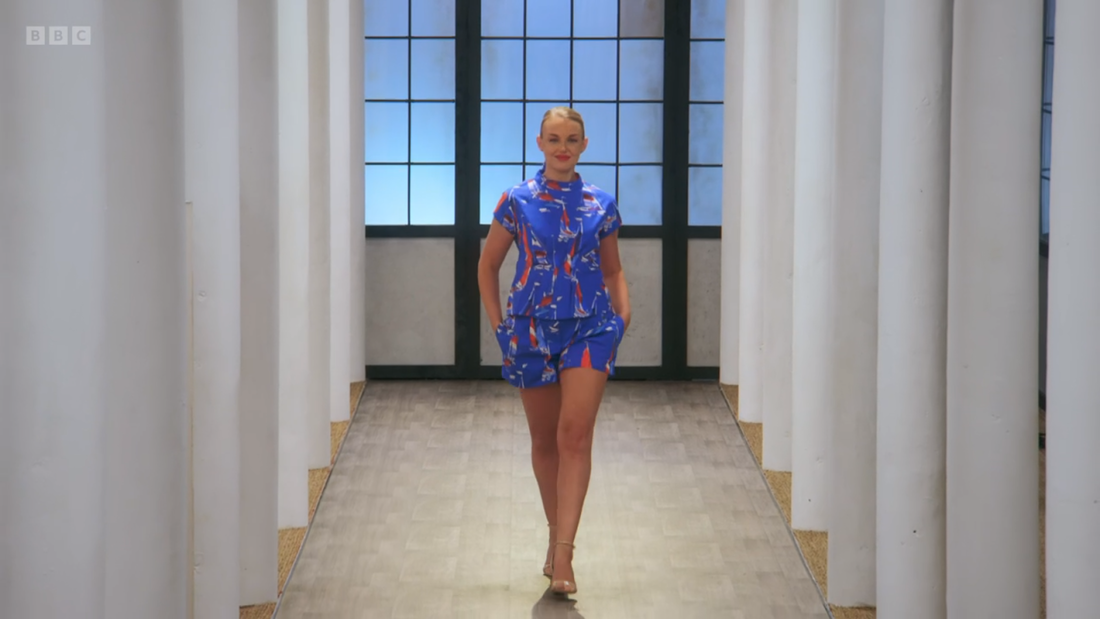 Reduce, Reuse and Re-cycle is the theme for next week’s episode and with the up-cycling of duvet covers it will be a must watch for Stitch Sewcial members. We were ahead of the Sewing Bee game with our very own #GetSetSew duvet transformation challenge last year.
I wonder if the Bees can live up to the stunning creations that were made by our amazing group members? Not long to wait to find out now, see you in the live chat 😊 If you want a roundup of the patterns in this episode check out our favourites The Fold Line who have written a fabulous post!
1 Comment
In which #everythingmustbeleopardprint
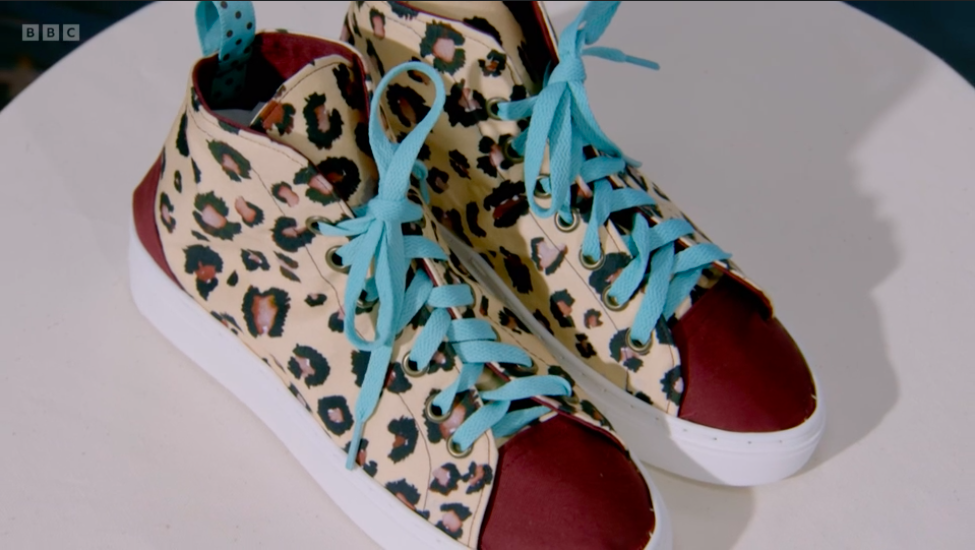
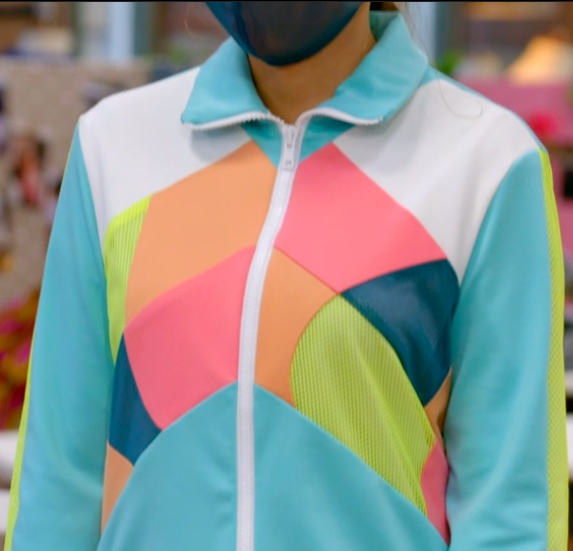
The pattern challenge, and a first for the Sewing Bee, was footwear, in the form of high top trainers. This challenge was a big hit in the Stitch Sewcial chat, and led to lots of discussion and googling for patterns, soles and trainer kits. The personalities of the sewists really came to the fore in this challenge in their choices of fabric, including the rather unusual choice of tweed for footwear, which reminded me of the time my bonkers husband did a cross country ski touring marathon in Switzerland wearing tweed breeches and a flat cap, maybe that should be the subject of another blog sometime!! Back to the Bee, and trainer making was not the easiest of challenges, involving the identical placement and punching of 28 eyelets for the laces to make the perfect matching pair. This left Debra asking what was wrong with velcro as a fastening! Gill ran out of time to complete her pair, whilst Marnie told the judges that her fabric placement showed her trainers meant business at the front and a party at the back! There were some amazing trainers for the judges to choose from and obviously I agreed with their winning choice being Man Yee’s, after all, have you seen my favourite memade dungarees?? #everythingmustbeleopardprint So onto the transformation challenge and this was certainly a very different one, transforming netball kit into glamorous daywear, what could possibly go wrong? As it turned out - not too much. This was probably one of the more considered transformations by the sewists, who used the pleats from the skirt in some very creative ways, on the whole creating some amazing garments. My absolute favourite was Debra’s top, where she had stitched the pleats down to create a gorgeous wavy design on her simply styled top, which Patrick said was ‘inspired’. However the winner was Brogan with a dress that used not only the pleated netball skirt, but also contrasting netball bibs and had so many details on it that it was hard to believe it had been made in the transformation challenge 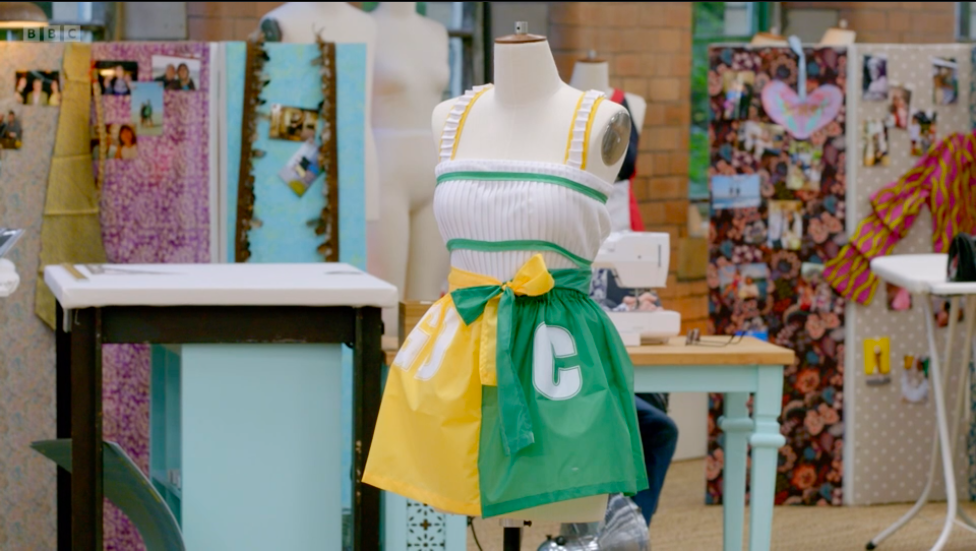 And in the blink of an eye, or the snip of a thread, it was time for the made to measure challenge... This Week the contestants were asked to make a jacket inspired by their sporting hero. The Bees’ thinking about how to represent their chosen sports person was truly inspired. There was not one but two Tom Daly jackets, one of which also gave a nod to his talent out of the pool, with hand knitted cuffs and collar by Richy, whilst Chichi used a patch work of colours and a lace sleeve (just the one sleeve) to represent both Surya Bonaly and Florence Griffith Joyner in her jacket. Angela played homage to Freddie Flintoff with a nod to Lancashire with a Lancashire rose fabric lining her pockets, and Gill lined her jacket with a wild cat fabric (that leopard theme again!) to represent Nicola Adams. Many of the jackets produced were amazing, and looked stunning on the catwalk. It has to be said that the sewing ability and standard of the contestants this year is very high indeed. Man Yes’s pattern was inspired by the climbing wall used by her sporting hero Kim Ja-in, and was beautifully made. However it was Marnie’s jacket, inspired by Heather Stanning, that won high praise from the judges and Garment of the Week, it really was impeccable. The contestant who left the show was Chichi, sadly her one armed jacket was not well finished and the judges felt she had not done enough this week to stay in the competition.
The verdict in Stitch Sewcial was that this was another great episode in what looks like it is going to be an amazing series this year. If you cant wait to get out there in our own Sewing Bee inspired me-mades then don't forget to take a look at the Foldline’s round up of patterns similar to those used this week.
And don’t forget to share your makes with us in Stitch Sewcial we love seeing what you’ve been inspired by.. Next week it’s all about summer outfits. With so many fabulous summer styles around at the moment I can’t wait to see what the contestants come up with. But - I’m going to finish this week’s blog post with something that Brogan said that rang true for me! When contemplating sports week she said ‘Fabric shopping would be my sport of choice…because that can get quite hot and intense’...if you've ever been fabric shopping in Goldhawk Road in London you will know exactly what she means!!
But the best thing was that it was so lovely to have our weekly Facebook Stitch Sewcial sewing bee group chat back again, I’ve missed this so much! The theme for week one was to create a capsule wardrobe of three items. In honour of their new location in an historic woollen mill in Leeds, the first Pattern Challenge was to make a wool mini skirt. The contestants were tasked with creating a skirt with a faced waistline and two piped edge patch pockets, both of which require sewing precision. The sample skirt that Patrick and Esme discussed the construction of with Sara raised a few eyebrows in the Stitch Sewcial chat, as the pockets certainly looked to be uneven! But that aside the first challenge was underway and the Great British Sewing Bee was back! Understandably the nerves of some of the new sewists was evident, with pattern instructions not being fully read (Patrick always knows!!) and piping edging being trimmed too short. However, some of the bees managed to keep their cool and produce some fabulous skirts, with Angela winning the first challenge. Her blue wool skirt with the contrast cotton piping that she made herself received high praise from the judges. So onto the Transformation Challenge and given that comfy clothing has been a wardrobe staple for many of us during the lockdowns the contestants were asked to up-cycle ready to wear loungewear into a top for going out. Think disco, think glam, think party, that’s certainly what they needed to be thinking for this challenge. As ever with the transformation challenge the results were somewhat mixed. Patrick was reminded of Dennis the Menace by Mitch’s make, whilst both Marnie’s and Man Yee’s creations impressed the judges. It was Marnie who won the challenge with her fabulous 80s inspired top with big pouffy sleeves and a contrast pink bodice And so to the final challenge and one of my favourite parts of the show, the Made to Measure. This time it was a wrap dress. You may know, I blooming love a wrap dress so I was super excited to see what the contestants would make. However, being something of a pedant, especially when it comes to sewing terms, I found myself super frustrated by the repeated descriptions of a flounce as a ruffle, you could say my flounce was truly ruffled!!
Anyway, back to the sewing bee wrap dresses! All the contestants produced a dress for judging although some were not totally finished. Man Yee deserves a special mention here for using organza for her dress, a notoriously difficult fabric to work with.
Overall, there were some really made lovely wrap dresses and it was hard to call the winner. Annie’s Ankara dress was one of my favourites. I have my own version of an Ankara wrap dress which makes me feel so chic so I may have been a bit biased here (it was a flounce and not a ruffle on this dress!!), I also really liked the keyhole back of ChiChi’s dress. It was a hard choice for the judges as the standard in this round was very high with lots of the sewists including features such as flutter sleeves, puff sleeves, colour blocking, contrast edging and did I mention flounces?! The winner was Debra with her beautiful watercolour wrap dress with contrast edge binding. The contestant who left the competition this week was Mitch. After his mini skirt with uneven pockets and Dennis the Menace transformation, I think the rather too short for a dress length of his wrap dress meant his fate was sealed. As much as I would have like to have seen him stay, I think this was the right decision. The verdict in Stitch Sewcial was that this was an amazing start to the series. If you’re itching to sew any of the garments made in the episode The Foldline have done their regular round-up of sewing patterns similar to those used. Next week is sportswear week. This is not usually one of my favourite weeks,, but the Bee has upped their game this year (see what I did there !!) with the inclusion of a challenge to make high top trainers. This has definitely piqued my interest no end and now I really can’t wait until next week’s episode. Don’t forget to share your makes with us in Stitch Sewcial ... we love seeing sewing bee inspired garments. Oh, and come join us for our live chat and quite possibly a cheeky G’n’T!
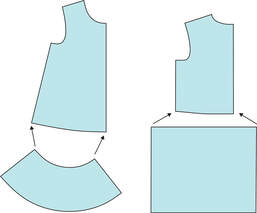
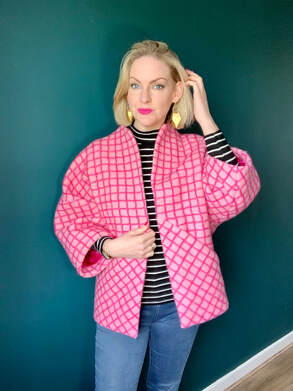
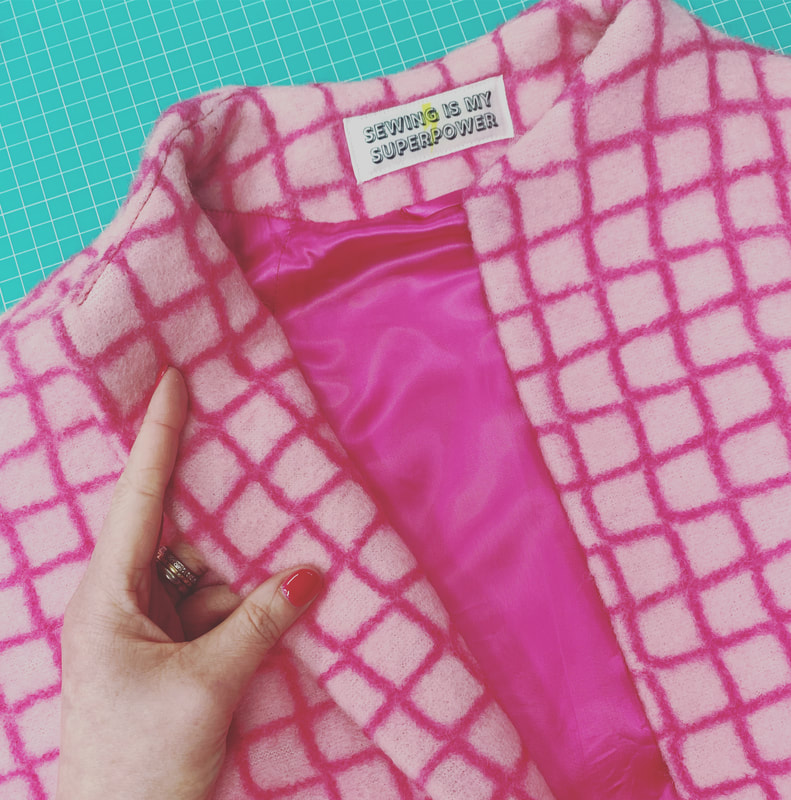
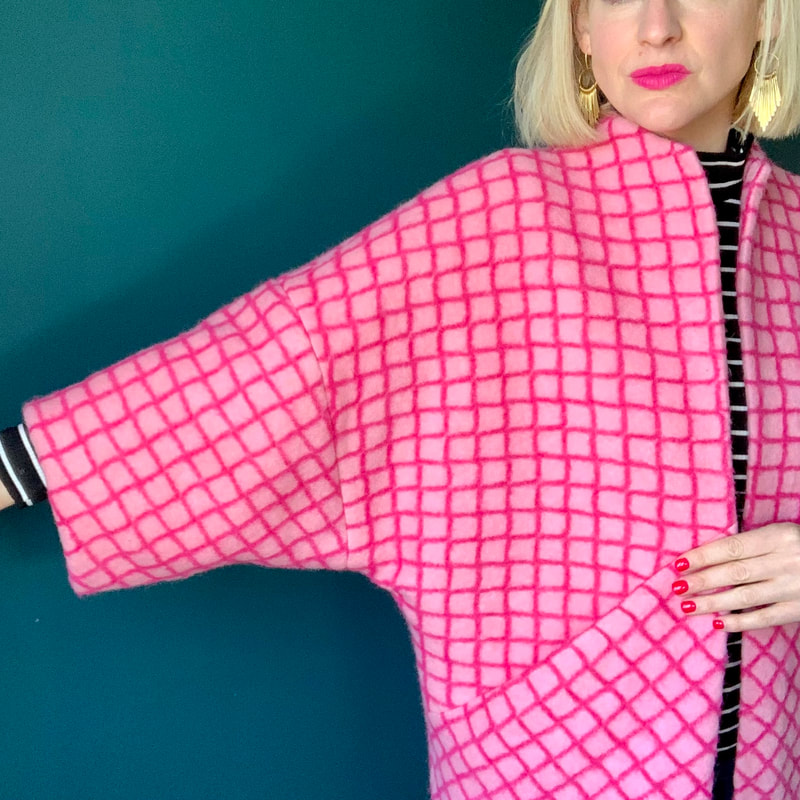
For this reason I have chosen it for my Intro to coat making workshop on Sunday 24th July I first made this coat in the longer version out of the trickiest Boucle wool ever, as part of the Sewing Weekender in May 2020. It was a bit of a comfort zone push for me having never made a coat for myself and since then I have been hankering after another... 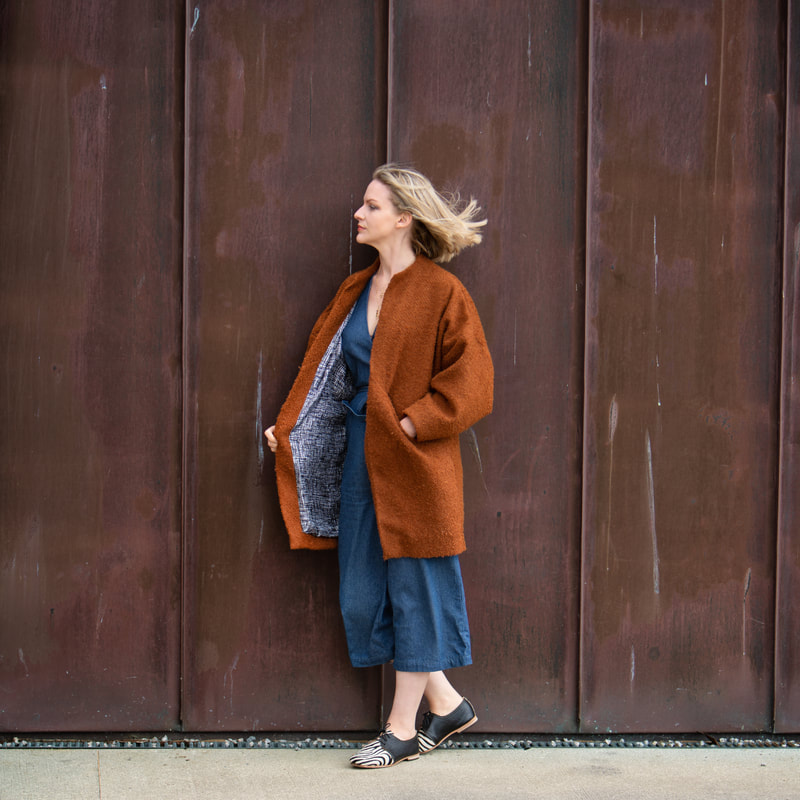 I love the combo of fabric and lining here... I have a bit of a thing for snazzy linings and my favourite place to buy them is Fabworks Online - their range is astonishing and the quality is superb. Anyway, just last weekend I decided the time was right for another and so the cropped Nova was born! This FABULOUS pink felted coating came from Truro Fabrics as did the lining with is their Bemberg Cupro range and silky soft as anything with a wonderful weight to it! This is a coat that fills me with joy - after a pretty challenging month of illness and bereavement it has injected a bit of excitement into my soul, and I can't wait to wear it out on a Spring Day! The short version is just as straightforward a make as the longer, made more straightforward by using a stable fabric and not the slippery, moving every which way Boucle I selected the first time around. The only modification I made was to insert a coat hang in the neck facing seam, and of course, one of my labels! I made a rouleau tube and then stitched that to the coat facing at the centre bottom edge with about 1 inch space between the two ends... I then pinned it out of the way so it didn't get caught in the stitching when I inserted the lining!
And don't forget, if you fancy making one (or ten!) of these yourself, you can book onto the one day zoom workshop here 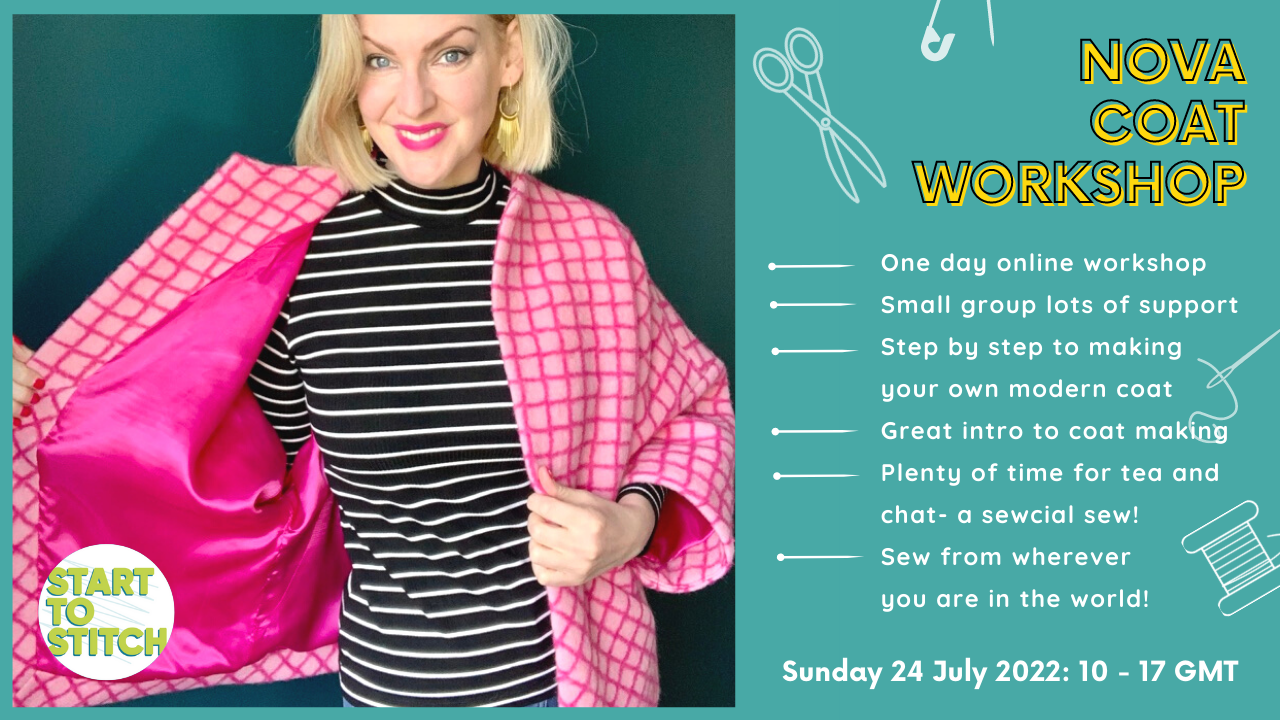 During your sewing journey, you’re bound to come across some real game-changing advice that sticks with you. It’s these little nuggets of wisdom that make the tedious and time consuming elements of sewing so much easier and quicker. Suddenly, that one task you’ve hated for so long, for example, adding hidden zips into your dresses, just became so much less fiddly thanks to a tiny little bit of advice that was shared with you.
Learning from others and listening to the wisdom that they can impart helps us to move forward with our sewing journey, and step out of our comfort zones. If you’ve found yourself nervously staring at your fabric stash, willing yourself to start creating more technically challenging garments, but not quite having the confidence to get started, this post is for you. I headed over to my wonderful free Facebook group dedicated to all things sewing, Stitch Sewcial, to ask our community what was the best piece of sewing advice they’d ever received. The comments blew up with advice, suggestions, and helpful tidbits that were just too good not to share so here goes! Best Sewing Advice: All About Sewing Machines If you’ve just bought a sewing machine, or even if you’re a seasoned sewist with several machines of different makes and models, these nuggets of advice from the Stitch Sewcial sewing community could make a huge difference to your sewing setup and how you care for your sewing machine at home! One member of the Stitch Sewcial community recommends changing the needle with every new project. We have a handy guide on choosing the right sewing needle for your project based on fabrics choice, thickness, and thread varieties, so go ahead and check that out. A couple of other members offered up handy advice regarding bobbins - including mentioning that if you actually manage to put it in the right way, it’s a real game changer! If you’ve found yourself struggling to remember if your bobbins go clockwise or anticlockwise, here’s a brilliant piece of advice to help you: “Does the bobbin go into the case in the shape of a 9 or a P? I have left-right confusion and could never remember if my bobbins went in clockwise or counterclockwise. (I have 5 machines, not all go in the same way.) Once I learned this trick I never get mixed up.” Best Sewing Advice: All About Thread When I asked the Stitch Sewcial members what their best piece of sewing advice was, so many members of the community started to share their thoughts on thread quality, threading hacks, and unpicking stitches. For those who often find themselves struggling to thread their needles, here’s a handy piece of advice to make the process easier: “Cut the cotton at an angle to make it easier to thread.” Another great tip regarding threading is to “hold the 2 threads and pull gently when you start sewing…there's no tangling at the start especially when topstitching.” I’ve said it before, but using good-quality thread will make your sewing projects look more professional and ensure that you don’t encounter fraying or any other issues that can occur with poor quality thread. Don’t just take my word for it, Stitch Sewcial community members also commented on the importance of using good quality thread, remarking that using good quality threads “which match top and bottom WILL make a difference!” This next piece of advice is a bit of a mindblower: “You can tie a new thread to the end of an old thread and pull it through the machine, instead of rethreading the lot.” Yes, you read that right! Think of the time and amount of faffing that could be saved, especially if you’re a beginner or a sewist who isn’t familiar yet with their sewing machine. And lastly, when it comes to sewing, “never use a stitch length shorter than you can unpick.” Unpicking is a nightmare and no one enjoys it, so make sure to heed this advice if you want to save yourself a lot of faff. Best Sewing Advice: All About Fabrics One of the most popular pieces of advice beginners and experienced sewists alike will have heard is, “measure twice, cut once!” This could arguably be the cardinal rule for cutting fabrics, so always remember to double-check your measurements. When it comes to buying fabrics, it’s easy to go a bit crazy and plan potential projects (especially garments) in advance. While this is a great idea for some (especially if you’ve found a fantastic deal on fabric), it can lead to a few problems later on…“It is a lot easier to buy fabric than to sew fabric! We change our minds after 6-12 months, or as the seasons change, and what seemed like a great idea last season may no longer be appealing. Try not to buy/plan projects too far in advance.” Best Sewing Advice: Let’s Talk About Learning New Skills Attempting a new skill for the first time is scary, no matter if it’s an essential life skill like riding a bike, or learning how to add a hidden zip into your new garment. Sometimes we limit ourselves from progressing by holding back on certain projects that require us to learn something new. The best advice for the situation is this: don’t! This advice sums this up perfectly - “Don't hesitate to try new skills, otherwise, they sometimes become insurmountable in your mind and scary.” Like I mentioned at the very beginning of this blog post, sometimes even the most experienced of sewists can learn something new, so it’s always lovely to be able to share our collective sewing wisdom with one another. This lady has been sewing for 55 years, and this was her best sewing advice: “Sew bias binding to the wrong side first, then you are machine stitching it down on the right side and can see how neat it is! Game changer after 55 yrs of sewing…!” Best Sewing Advice - General Sewing Advice Lastly, the StitchSewcial community has just a few more pieces of advice to share. For many, sewing is a hobby that provides escapism and brings us happiness - especially if we’re able to bring others joy in the process. For this reason, it’s important to remember that “There are no quilting police!”. Nothing has to be flawless, so try to hold that inner perfectionist at bay where possible. An interesting piece of advice that was left on our community wall provoked real thought and reminded us all that if it isn’t ‘perfect’, it doesn't matter: “The Amish put deliberate mistakes into their work as only God makes perfect things. Also applies to Persian carpets as only Allah makes perfect things.” Of course, we all want to create makes that we’re proud of, so a great piece of advice to follow is to “sew slowly!”. Sometimes things don’t work out, mistakes get made, and frustrations grow. In this case, a lovely piece of advice from our community that made me smile was this: “Don't blame the machine or the kids if it's actually your own fault there's a problem, i.e. not concentrating on what you’re supposed to be doing, or rushing through/guessing the instructions. I've definitely been guilty of that.” I think we’ve all been guilty of something like this! A Massive Thanks To The Stitch Sewcial Crew! I want to say a huge thank you to everyone in the Stitch Sewcial Facebook Group that took the time to comment with their best bit of sewing advice! It’s so humbling to know we have cultivated this little bubble of positivity for passionate sewists to come and talk about sewing projects, share help and advice, and discuss all things sewing. I hope that some of these quotes resonated with you and will help you move forward in your sewing journey. If you have any game-changing advice of your own that you’d like to share, please feel free to pop over and join our group, leave me a comment/DM on Instagram, or drop a comment below! As sewists, we don’t always spend much time thinking about how our sewing machines feed our fabric through as we stitch. Quite often, our minds focus on how beautiful our finished projects are going to look, however, it is important to understand how sewing machines feed fabric through as this can greatly impact our sewing results.
For example, poor feeding of the fabric can result in disastrous issues that can negatively affect the visual and practical elements of your finished product. To name just a few ways that poor fabric feeding can affect your sewing project, it can:
With that being said, please don’t worry because I’m here to help! No one wants to pour hours of time and passion into a garment only for it to end up not fitting correctly or to find that, despite your best efforts, your patterns just haven’t matched up seamlessly. That is why today’s focus is on the differences between the walking foot and the dual feed foot. Before we get into the comparisons, let’s have a quick recap and ensure we all fully understand how sewing machines move fabrics. How do sewing machines move fabric? Every sewing machine moves fabric using the feed dog. The presser foot holds the fabric in place whilst the feed dog moves, taking the fabric with it. You can learn more about this section of your sewing machine, as well as the other elements of your machine, in our handy Glossary Of Basic Terms. You may also find our guide on How To Properly Care For Your Sewing Machine At Home to be a useful source of information about your sewing machine mechanics. At the end of stitching, you may have noticed that your two pieces of fabric are mismatched. Depending on the type of fabric used, the pieces you have stitched may be out by a few millimetres, or there may be a significant difference in positioning between the two pieces of fabric This is because the feed dog is actually only moving the lower piece of fabric that sits on the feed dog teeth. The upper piece just comes along for the ride, and this is what causes misalignment. Moving Layers The walking foot moves all the layers of fabric at the same time and pace. The dual feed function, however, affects the top layer, whilst the feed dog controls the bottom layer. This is achievable because the dual feed foot has its own separate motor that allows the top piece of fabric to keep up with the pace that the lower piece moves at. On the other hand, the walking foot has no motor. Subsequently, the foot is dependent on the feed movement, and can therefore only move the layers at the same time. Once the walking foot gets to the back, it lifts and springs forward, waiting for the next feed dog stroke. Walking foot vs Dual Feed foot... Now we understand exactly how sewing machines move the fabric, it’s time to dive into the differences between the walking foot and the dual feed foot. Even feeding and pattern matching Both the walking foot and dual feed foot can be successfully used for precision stitching, as well as matching plaids and patterns, and sewing techniques that require an even feed as the fabric moves under the foot. That being said, due to the walking foot’s lack of motor, it’s likely you’ll find matching certain styles and patterns of fabric, such as plaids, to be extremely difficult. The plaid is likely to be slightly mismatched, giving the garment a ‘homemade’ feel, rather than a professional finish. Which is better for quilting? The walking foot is ideal for quilting as it keeps the fabric and batting layers together, preventing any misaligned layers and puckering as you sew. On the other hand, the dual feed foot will affect both the top and bottom later of your quilt, leaving the batting with very little control. The dual feed function can be used for stitching small quilted items with light batting, however, it’s not suitable for large and heavy quilting projects. Dual Feed Foot Varieties There are several different varieties of presser feet that are available as dual feed feet. These different dual feed feet come in handy depending on your choice of fabric, and the types of sewing techniques you’re planning to use. For example, the open embroidery presser foot is great for freehand decorative stitching, whereas the jeans foot is ideal for thick, heavy fabrics such as denim. The correct sewing posture is vital if you want to enjoy a long and pain-free sewing journey. So often we become engrossed in our projects and neglect our posture, leading to aches and pains that can limit our ability to sew comfortably. This year, I want sewists to pay more attention to their postural health and work towards creating a healthy sewing space that promotes good mental and physical wellbeing.
The first step towards creating a healthy sewing space is to be more mindful about your posture when using your machine, so to help guide you, here are 5 tips for helping to improve your postural health when sewing. 1. Don’t use your sewing machine on the floor or a low platform. If you’re currently using your sewing machine on the floor, or a low flatform such as your coffee table, please stop! This position is incredibly bad for your posture, but not only that, working with a machine at such a low height gives you far less control over the foot pedal, over your machine in general, and forces you to instinctively lean in closer to get a better view. As a result, your body ends up in a position similar to a semi-circle, creating strain in your arms, neck, back, legs, and shoulders. In fact, after 10 minutes or so in this position, you’d likely find that your whole body would start to ache uncomfortably and you’d probably get fed up with sewing quite quickly. Frequently sitting in this position could lead to serious postural health concerns, so instead of having your machine set up on a low platform or the floor, find a table or platform that you can adjust to your ideal height. The ideal platform should allow you to keep your back straight, your neck in sync, and your feet flat on the ground. You should not be hunched over, your shoulders should be relaxed and you should have plenty of room to move your arms around whilst sewing. 2. Finding the ideal height for your sewing table and chair. The ideal height for your sewing machine table and chair will depend on your height and build, but commonly a table measuring around 28 - 30 inches tall works for most people. To find the most comfortable position to sew in, sit upright with your head above your shoulders, elbows in, and feet flat on the ground. Sewing chairs are usually adjustable too, so be sure to adjust both table and chair until you can comfortably stay in a position that promotes good posture whilst sewing. 3. Looking after your postural health whilst standing. If you struggle to keep track of your posture when sitting, standing to sew might be beneficial to you. Ensure that your table is at the correct height, and when you sew, you’re standing tall rather than slouching or leaning into your hip. 4. Take frequent breaks and stretch out your muscles. If you have ever worked in an office, you’ll know that sitting in one position for too long can cause discomfort. Every now and then you must move away from your sewing machine and take a break. Do some yoga or some stretches, go for a walk, or just head to the kitchen and make yourself a cup of tea. Moving your body will reduce built-up tension and help you to relax. 5. Ensure you have good overhead lighting. Dim lighting makes us lean in closer to the machine because the visibility is too poor for us to maintain a good postural position. Our instinct is to slouch forward, creating tension on our shoulders, back, arms, and neck. To avoid slouching for a better view, and avoid putting extra strain on your eyes, make sure you choose to set your sewing space up in an area with good natural light or invest in an overhead LED light. It’s normal to catch yourself slouching again… These postural health tips should help you on your way to creating a healthy sewing space that nourishes your creativity and supports your body correctly when sewing. It’s normal to slip back into slouching when sewing, especially if you’ve never tried to focus on improving your posture before. If this happens to you, don’t beat yourself up about it; instead, simply correct your posture whenever you notice it starts to slip. Sitting with the correct posture may even be uncomfortable at first as your body adjusts to its new positioning, however, in the long run, these changes will vastly improve your physical wellbeing and help you to avoid injury. Ready to try it out? Try these free Start To Stitch Patterns! If you’re eager to put these tips into action, take a look at our free Start To Stitch patterns! Have a go at being mindful of your posture whilst sewing a quick and easy project, such as the Start To Stitch Twist Headband pattern, or the Kids Dress-Up Cape pattern. These are beginner-friendly, quick, and easy projects to get you used to sitting properly at your sewing table. Let me know how you got on over in the Stitch Sewcial Facebook Group, or leave a comment below! Not too long ago, I wrote a blog post entitled Why Do I Do What I Do?
This was a personal post for me yet the topic of sizing within the fashion industry resonated with so many of you. Ready To Wear clothing often simply doesn’t make us feel good about ourselves. Instead, it repeatedly makes us anxious, lowers our self-esteem, and cultivates feelings of self-doubt. The fact of the matter is this: we weren’t made to fit into clothes; clothes should be made to fit us. With that in mind, one of the huge benefits of sewing your own clothes is that you are in total control of styling and sizing. Once you’ve mastered how to accurately take your own body measurements for garment making, you’ll never need to worry about ill-fitting clothing ever again. Creating a piece of clothing that fits you perfectly and makes you feel good about yourself is quite euphoric, especially for those seeking plus-sized items. The struggle is real, and we all know that inclusivity and style don’t often go hand in hand in the fast fashion industry. That being said, with the right pattern and a fairly basic grasp of sewing, you will be able to make an inclusive, me-made wardrobe that fits you perfectly. Here are some of the most popular inclusive, plus-sized pattern designers around at the moment. These designers offer a huge range of sizing options as well as styles so you’re bound to find something that piques your interest. Helen’s Closet Helen’s Closet is passionate about providing easy-to-follow patterns for timeless classics. The patterns range from size 0-30 US and offer cup sizing where applicable. These wardrobe staples include tops, dresses, shirts, cardigans, swimwear, jackets, and much more. The Helen’s Closet website also has a great blog where the designers share pattern hacks and sewing tutorials. Do It Better Yourself Club (DIBY Club) Jessica Hooley started out the Do It Better Yourself Club - or DIBY Club for short - as a lifestyle blog that encouraged women to be “as self-sufficient as they choose”. With the goal to make sewing accessible and fun for everyone, Jessica’s downloadable PDF patterns come in an extensive size range (00-36US) and are accompanied by a full ebook’s worth of instructions, custom fit tutorials, and video tutorials. Closet Core Patterns (Formerly Closet Case Patterns) With downloadable sewing patterns and sewing courses that feature, in their own words, “obsessively clear step-by-step videos”, Closet Core Patterns offer a huge range of clothing patterns and tutorials that are extremely inclusive. The Closet Core Patterns blog features fitting tricks and hacks to ensure that each piece fits perfectly, as well as tutorials and freebies. Sizing ranges from a US 14-32. Muna and Broad Muna and Broad is the brainchild of Leila and Jess - two ladies who met via Instagram and bonded over the lack of patterns available for women in their sizes. Muna and Broad design patterns up to a 71.5 inch hip, stating that they aim for their designs to look amazing and fit larger bodies well. In honour of inclusivity, the Muna and Broad team will grade their patterns up for free if you don’t fit their size chart. Friday Pattern Company Modern, on-trend pattern designs straight from sunny California - the Friday Pattern Company are ensuring that inclusive fashion stays stylish. From surfer girl to the cottagecore aesthetic, the Friday Pattern Company provides detailed PDF downloads and video tutorials that cater for bodies up to a 63 inch hip. Cashmerette At Cashmerette they we empower sewists with big boobs to create a dream wardrobe that actually fits. From sewing patterns in size 0–32 and cup sizes C–H, to the monthly Cashmerette Club, online workshops and best-selling book, they're with you every step of the way! January is sort of a throwaway month in my eyes. It’s a month that can go either way; you get the results that your motivated and inspired self wanted when they woke up on the 1st, or you lose track of your goals somewhere and end up feeling disappointed in yourself. However, with the shiny new month of February hitting us, comes that all-important new hit of motivation, but this time, you’re ready for it.
In February, there are no social pressures to be perfect, no heavy emphasis on achieving something by the end of 30 days. All of that has been and gone, making now the perfect time to harness that motivation and get started on those goals. Want to learn something new in 2022? If learning to sew is something you’ve dreamt of for a while now, you’ll probably have asked yourself if you’re really capable of creating your own clothes, sewing gifts for loved ones, designing quilts, or maybe even just repairing the garments that have been sitting unloved in your wardrobe. I can say, without a shadow of a doubt, that you ARE most definitely capable of all of those things and more. All you need is the willingness to commit to learning a new skill and the dedication to keep at it, even when you make (inevitable) mistakes. Sewing is a valuable, rewarding, and enriching skill to master. Sewing is much more than a means to fixing damaged clothing - although sustainability does play a big role in the way I sew and is a big part of the Start To Stitch ethos. Sewing is a hobby. It’s a form of self care. It’s acceptance into a community of warm, social, and knowledgeable people. It’s a way of learning to love our bodies - no matter what shape or size we are. Sewing teaches us about patience and hard work and it teaches us to use our creativity in a productive way. Book yourself a place on the next Back To Basics Sewing Course Teaching others to sew is my passion.Learning to sew was certainly one of the best choices I ever made. It dramatically changed my life and catapulted me into so many buzzing, lively careers, and experiences, until I landed here and realised that my dream, my true calling, was to teach others the skill that had so wonderfully influenced my life. I started off sharing my knowledge in intimate workshops, but due to COVID restrictions, I decided to take my learning online. That’s around the time that my first online Beginner and Intermediate Sewing Course were born, and even a couple of years on, they’re still some of my most popular products. Why? Because when you learn a skill from someone with passion, it rubs off. Sewing is for EVERYONE. Learning to sew is going to be a skill that enriches your life and helps you to play your part in protecting our planet from the devastating destruction caused by the fast fashion industry. Anyone and everyone can learn to sew; it’s an extremely inclusive hobby. It doesn’t matter what size, shape, gender, or class you come from, because everything you do can be tailored to your own preferences. But before you get too carried away, you need to learn the basics. Why Choose The Start To Stitch Back To Basics Beginner’s Sewing Course? The Start To Stitch Back To Basics course is a great gateway into the world of sewing. The 5-week course covers everything you need to know about setting up your machine and getting started, as well as basic troubleshooting and, of course, lots of fun sewing projects. Our online courses are accompanied by a dedicated class Facebook Group, weekly Zoom meetings, and a direct line to me - your sewing chief and expert - Annie! A comprehensive foundational sewing course, 66 video lessons, lifetime access, and live support as you go - what's not to love?! Breaking down the course materials briefly for you here, you can see that you get a lot of bang for your buck when you book onto a Start To Stitch course.
Committing to a 5-week course can sound daunting - I mean, what if you don’t get on with the way the course is laid out, or the video content doesn’t help as much as you’d hoped? Well, I’ve thought of all of that and that’s why I’m offering a FREE mini course to get you started, where you can see how easy it is to learn to use your sewing machine - you can sign up here! And if you like it you will get 10% off the full back to basics programme :) Book yourself a place on the Start to Stitch FREE mini course! Looking to further your sewing knowledge?If you’ve already mastered the basics and you’re ready to learn some new techniques and patterns, it could be time for you to invest in the Start To Stitch Intermediate Sewing Course! Take a look at our Academy page for more information on the Back To Basics and Intermediate courses, as well as details of our other Start To Stitch courses. Every once in a while, just like every other sewist out there, I lose my sew-jo. I know, I know. How can a sewing tutor lose their sew-jo? How can someone whose whole life has been shaped and defined by sewing, possibly lose their sewing momentum? The answer is pretty simple: no matter how much you love sewing, every now and then, it all gets a bit too much. It can be hard to find the motivation to cut fabric because all you want to do is sew. It can be annoying when you have a perfect idea for a project, but you can’t find a pattern you’re happy with. Even worse, it’s tough when you desperately want to discuss your sew-jo issues with people who will be able to relate, but you simply can’t find a place to share your experiences with. 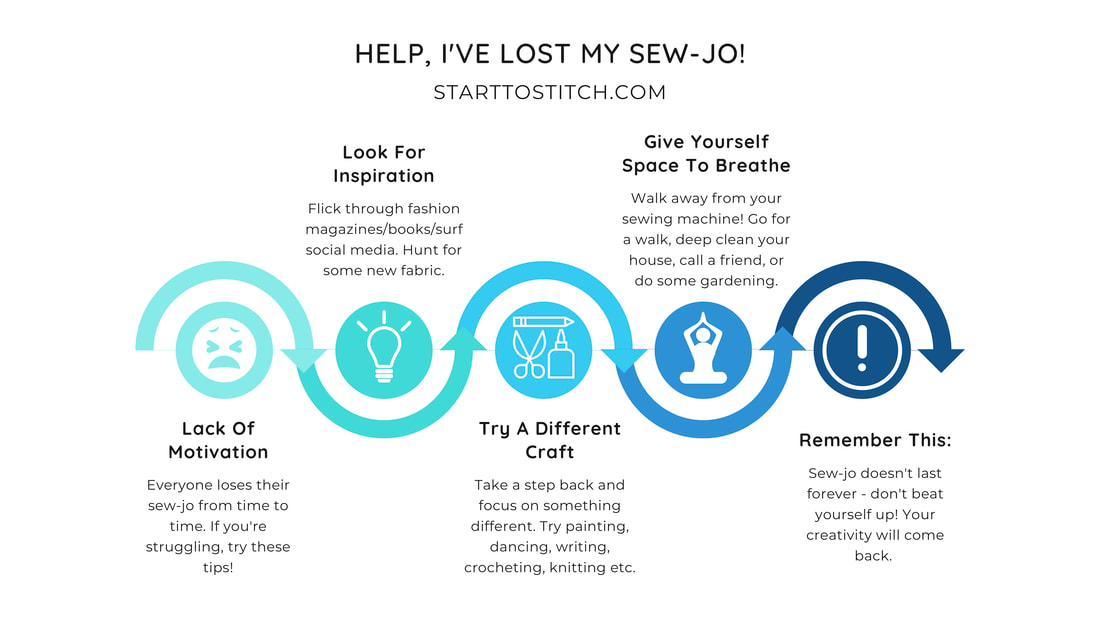 Share your journey with us in Stitch Sewcial One of the most successful ways to overcome losing your sew-jo is to find a safe community made up of people who share a passion and love for sewing. Fortunately for you, we happen to run the brilliantly supportive Stitch Sewcial Facebook group. The Facebook group is free to join and gives you access to lots of help and advice, as well as access to our monthly #GetSetSew challenges. These monthly challenges are designed to encourage our members to try new makes and learn new skills. What to do when you lose your sew-jo! Chatting to other sewists isn’t the only way to give your passion for sewing a little boost. I took to Stitch Sewcial to ask our members how they cope when they lose their sew-jo. I wanted to know what works for them; what methods have helped our real-life sewists find their flow again after they’ve had a tough time on their sewing journey. Below is a list of things that our wonderful Stitch Sewcial members have recommended for those pesky days, weeks, or months where sewing just seems to be the furthest thing on your mind. Look for inspiration One of the first things to do when you lose your sew-jo is to look for inspiration. You may have lost your sew-jo because you’ve run out of project ideas, you’re sick of making the same things over and over again, or even because you’re looking for something a little more challenging. Our members suggest seeking out some inspiration to help you find your sew-jo once more, here are a few suggestions:
If you’re really struggling to find your sew-jo, maybe taking a step back and giving something else a go will be beneficial to you. Do you enjoy any other crafts? Is there a particular craft you’ve always wanted to try? Now is your chance to give it a go! Some other craft ideas that our Stitch Sewcial members came up with include:
Give yourself space to breathe Sometimes walking away from sewing completely and giving yourself a breather is the best way to restore your sew-jo. This isn’t just beneficial for sewists who have lost their motivation, but it’s also a good way to give your mental health a boost. Give your mental health a boost and restore your sew-jo by:
Advice From The Stitch Sewcial Sewing Community If you’re still looking for advice on how to get your sew-jo back, these tips and tricks from the Stitch Sewcial community might put your mind at ease. Remember that at some point, everyone will lose their sew-jo; just like every other hobbyist will experience the same lack of motivation when it comes to their passion. It’s a normal part of life, so remember that it won’t last forever! Extra advice from our amazing Stitch Sewcial members about what to do if you lose your sew-jo:
Find Your Sew-jo Again with our Free Patterns From Start To Stitch If you’ve decided to seek out some new patterns in a bid to save your sew-jo, have a look at some of the free patterns we offer on our website: Start To Stitch Twist Headband Pattern, the Start To Stitch Face Covering Pattern, Start to Stitch kids dress up hero cape, and the free Start To Stitch bunting pattern. |
AuthorSewing. pattern cutting, teaching, tea and Jelly Babies! Categories
All
Archives
December 2023
|

 RSS Feed